Objective
To share files of several gigabytes (GBs) locally between two computers.
Usual ways
- Cloud storage (e.g. Dropbox, Google Drive)
- Inefficient for slow Internet connection
- Limited file size in an upload
- USB storage devices (an example of Sneakernet)
- Need to copy the file twice
Technology that I used
Connect the two computers using a LAN cable.
Reasons:
- Unlimited sharing of data
- Fast data transfer: the bandwidth isn’t limited by ISPs.
Following the instructions from AN0NYM0U5, one should be able to set up a “connection” between two Windows 7 computers. I just highlight some important configurations to be done in Windows 7’s Network and Sharing Center.
- Connect the 2 machines through a LAN cable.
- Ensure that the file access rights are properly set.
- Set the properties of the “Local Area Connection” → “…IPv4”.
-
Set the values according to the table below.
First computer Second computer IP address 192.168.1.1 192.168.1.3 Subnet mask1 255.255.255.0 255.255.255.0 Default gateway 192.168.1.3 192.168.1.1
Observations:
- The IP addresses for both computers should start with “192.168.”, which stands for private network, and they should be different.
- The computers in the connection should share the same subnet masks.
- The default gateway for each computer should be the IP address of the other computer.
Sample screenshot
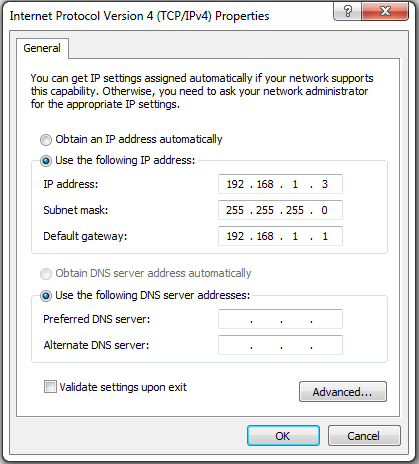
The IPv4 properties for the second computer.
Remarks: The above steps is for Windows 7 only.2
How about setting up a connection between Linux and Windows?
Connection between Windows and Linux
- Do the above network configurations on Windows 7.
- I will treat my Linux desktop as my first computer, and my Windows 7 laptop as my second one.
-
Install openssh-server on Linux.3
~~~ $ sudo apt-get install openssh-server ~~~
- Do some of the following settings on Linux.
Remarks: These steps should be done efficiently.
Using GUI on Ubuntu
It’s quite easy to set up the connection with Ubuntu’s Network Manager.
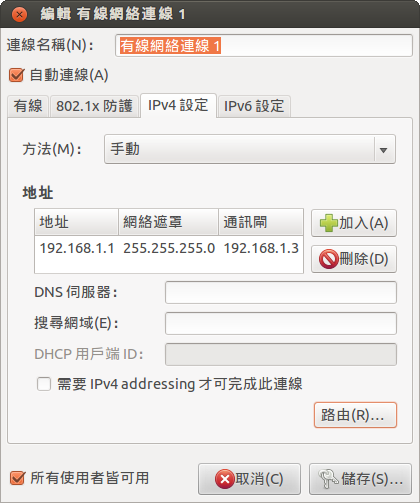
The route settings (the button with “(R)”) can be left out.
Using the terminal
It’s possible that the layout of GUI tools changes from time to time, but unlikely for commands. Moreover, a Linux computer does not necessarily has a desktop. Therefore, the commands are worth learning.
(Last edited on JUN 16, 2014)
- Change IP addresses in both machines. (Instructions on nixCraft)
- Set the default gateway. (Instructions on nixCraft)
To sum up, issue the command for “2” right after “1”.
$ sudo ifconfig eth0 192.168.1.1
$ sudo route add default gw 192.168.1.3 eth0
Output
$ ifconfig eth0
eth0      Link encap:Ethernet  HWaddr b8:ac:6f:db:d1:0c
          inet addr:192.168.1.1  Bcast:192.168.1.255  Mask:255.255.255.0
          inet6 addr: fe80::baac:6fff:fedb:d10c/64 Scope:Link
          UP BROADCAST RUNNING MULTICAST  MTU:8000  Metric:1
          RX packets:36250 errors:0 dropped:17 overruns:0 frame:0
          TX packets:27619 errors:0 dropped:0 overruns:0 carrier:0
          collisions:0 txqueuelen:1000
          RX bytes:29592391 (29.5 MB)  TX bytes:4441266 (4.4 MB)
          Interrupt:42 Base address:0xe000

$ route -n
Kernel IP routing table
Destination     Gateway         Genmask         Flags Metric Ref    Use Iface
0.0.0.0         192.168.1.3     0.0.0.0         UG    0      0        0 eth0
169.254.0.0     0.0.0.0         255.255.0.0     U     1000   0        0 eth0
192.168.1.0     0.0.0.0         255.255.255.0   U     1      0        0 eth0
If the net mask is omitted, it will be automatically set. It can’t
be arbitrarily set. If eth0 is already up, then the word up can
be omitted in the command.
Notes:
- The changed network settings can disappear if one
does it slowlydoesn’t uncheck the “Automatically Connect” option in Ubuntu’s Network Manager. - If the default gateway isn’t set, one can still connect the two
computers.
However, I observed that such a connection isn’t so stable. - The connection established through Ubuntu’s Network Manager doesn’t have such problem.
If a local area connection has been set up successfully, one should see an active network in Windows 7’s Network and Sharing Center.
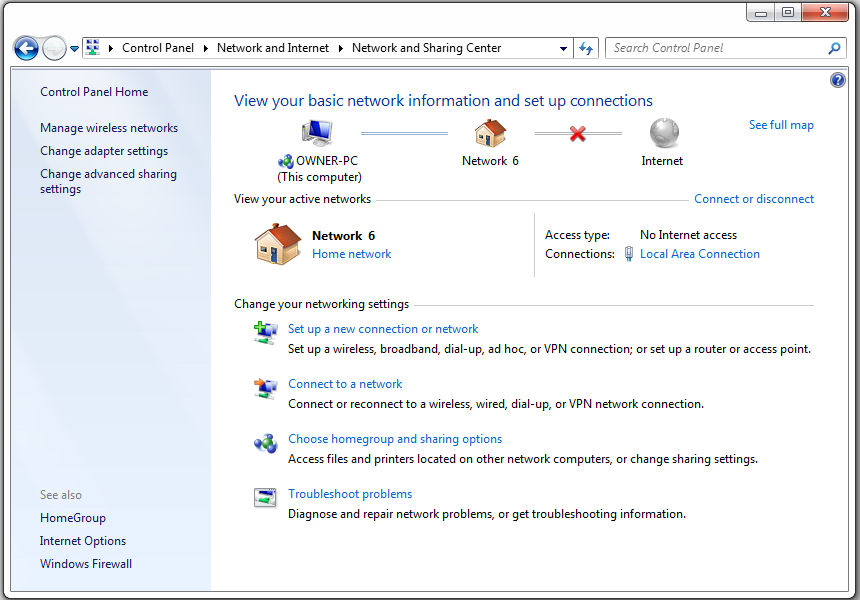
Remote login via SSH
Before actually using SSH, one can using the following commands to check if the remote server is up. For more details, such as the number of packets sent to the remote machine, check it elsewhere like the command’s manpage or the Internet.
$ ping [host] # send some packets to `host'
$ nmap [host] # detect which ports are open
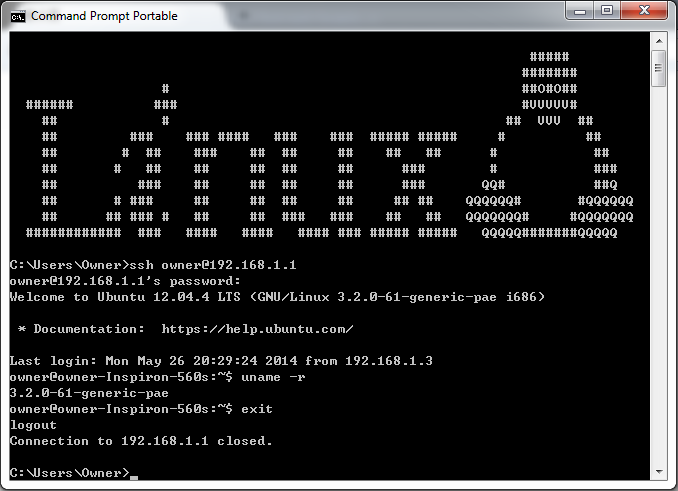
At first, I tried ssh 192.168.1.1, and was prompted to input my
password. Unfortunately, I overlooked the user name. Even though I
repeatedly input the correct password, my Ubuntu computer denied
my “remote” access via SSH.
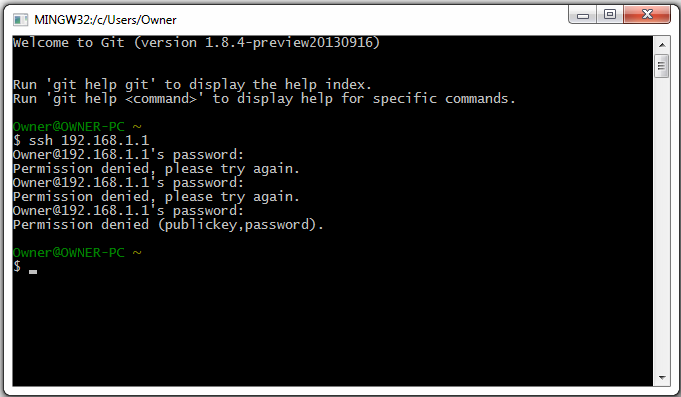
I recalled that *nix terminal are case sensitive, unlike Window’s Command Prompt. Therefore, specifying the appropriate user name and password at the remote host, the SSH connection should be set up.
File sharing via SCP
To save time and effort, I just include two links for interested readers.
- A brief summary of the usage of
scpon Indiana University Knowledge Base (URL)~can be used afteruser@host:to indicate the home folder.
- More examples of SCP commands. (URL)
Using Git
According to the official manual, SSH paths are supported by
the SCM. For example, to copy a Git repository called myproj from a
Linux machine, I can use the following command.
$ git clone ssh://owner@192.168.1.1/~/myproj
One can perform a Git fetch more quickly after adding the SSH path of the Git repository on the “remote” machine into the list of remote repositories.
$ git remote add ubuntu_desktop ssh://owner@192.168.1.1/~/myproj
$ git fetch ubuntu_desktop [branch]
However, git push to remote machines will fail if the remote
repository being “pushed” is non-bare. Either setting up a bare
repository at the “remote” *nix computer or pushing the branch will
solve the problem.4
-
As can be seen from the contents below, I aim at setting up a connection between Windows and Linux, on which the subnet mask can’t be set to “225.225.225.0”. ↩
-
I learnt it from Ask Ubuntu. ↩
-
A question on Stack Overflow. ↩